Showing posts with label encounters. Show all posts

Thursday, April 15, 2010

Return of the DM

As the undead corps raises to attack a player, i too must get up and start blogging again

December 19th, 117 days ago wow i can't belive that was my last post

Sometimes life gets busy and prevents us from playing the game we enjoy. With Busy work and a new kid life does indeed get busy.

What's been going on!

D&D Encounters

Can you belive we are half done season one already. Next week will be session 6. Over all the Encounters have been great.


There is something about the magic of undermountain that forces my players to roll like crap. Undermountain was for some of us our first true introductions to D&D some 15 years ago. (holy crap im old). Every one of my normal crew who played in those games were looking forward to playing in the #dndenc

The game started off rather good, with the players realy owning the first encounter. But then as things started to pickup and they entered into undermountain the trouble begain. They worked their way through the skill challenge with was possibly the most memorible one ive seen and found the entrance to the lost halls.

Now the players are searching through the halls to discover more information, find treasure, and perhaps discover secrets of undermountain.

Overall the game was well designed and so far loved by players.

Its Hammerfast Time!

If you've had the kind of weather i had these last few days youll know there has been some enjoyable days. A little known fact about us canucks, is that we like to BBQ any chance we can.

Last weekend was no exception, bright sun, cold breeze, we fired up the bbq and had a impromtu #dnd game. Everyone made dwarves and we decided to run in Hammerfast since i picked up the booklet.


What a great little book, if your a dwarf fan it is a must have. Lots of great NPC's, adventure ideas, storylines, and leaves everything open to the DM.

I used some old maps from some previous game day events to run the encounters on, those maps sure do come in handy. And we played well into the night. The game was so enjoyable the players decided to play again the next day. Promptly running into a 14th level mind flayer (Party level 2)

In anycase D&D for me is on the upswing again, and i shall do my best to at least post once a week on news and other geek items.

Tip for Organizers: Need more players comming out to your events? Offer a bonus action point for 1st time people.

Thursday, July 30, 2009

Turn by Turn: IniTracker

While most people are rewviewing the new monster builder in DDI's Adventure tools, i thought i would spend some time on IniTracker. IniTracker is a solid initative tracker for 4e. IniTracker isn't just a initative tracker, its should be every DM's right hand, their personal secetary tracking everything a DM can't otherwise it would bog down the game too much.
  • You can manage groups of NPC's to plan multiple encounters at once
  • You can track players and remind them when they are bloodied, when to make saving throws
  • Track hit points of all targets
  • Apply and track effects on all creatures
What it can't do (yet) is
  • Roll dice (fine by me i'd rather use real dice)
  • Save Encounters (work around by create monster groups)
  • Load data from DDI Compendium (have a second window open)
So Posted here is a quick guide on how to use the tool i've posted multiple screenshots of a dummy encounter so you can see it in action. Great tools that work well with IniTracker is DDI Compendium & iplay4e.com

Adding a Player


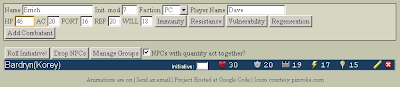
Enter in the basic information such as name, defenses inititve modifier. If a player has immunity, resistance vulnerbility to anything just click on the buttons and a new section will open up for you to put the information in the field. Don't forget to change the Faction to PC and enter the players name. Then click Add Combatant to add the player to the list

Adding a Monster


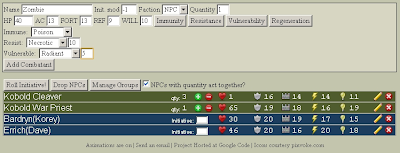
Adding a monster is the same thing In this shot you can see that im adding a zombie who has immunity to poision (and disease), resist necrotic 10, and vulnerable radiant 5 Instead of making the faction PC, its changed it to NPC and allowed me to enter a quantity i can chose to roll 1 initative for NPC's with more than 1 qty, this is great for minions.

Round 1 Fight


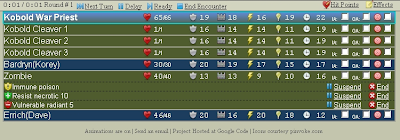
Once you [Roll Initative!] the screen changes you get a tool bar at the top, and a list of monsters in order with all relevant information.

Damage


To damage a creature
  • first select the target icon next to the creature
  • click on Hit Points to open up the hit point menu
Here you have access to everything related to hit points.
The field is where you put the number, and then you can chose if its damage, healing, ongoing damage etc. The check boxes allow you to select what kind of damage it is, this will come into effect for resistances, immunities, and vulneribilities.

Next Turn
This is rather simple, using the blue button menu on the top you hit the next turn button to move to the next creature in the list. If they delay, then simply click delay, if a player readies an action click ready. Once the encounter is over click End Encounter
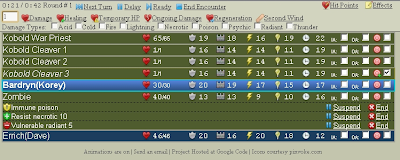
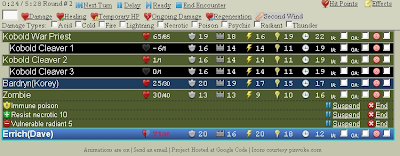
Dead Creatures


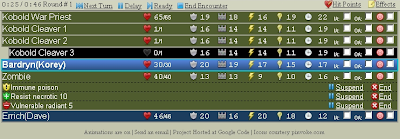
So here we can see that someone has killed Kobold Cleaver 3, he only had 1 hp so he was a minion. Dead N/PC's are show by indenting the list, and coloring the blackground back.

Ongoing Damage


Adding ongoing damage is just the same as damage
  • select your target
  • click on hit points
  • enter in the value for the damage
  • click the damage type if any
  • click ongoing damage


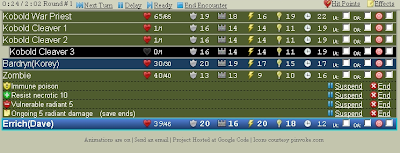
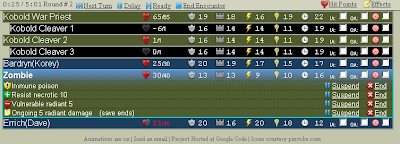
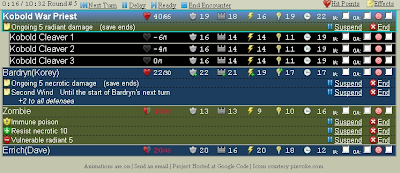
Now we can see the zombie has ongoing 5 radiant damage (save ends)

Bloodied


When a player or creature goes bloodied the color of their hit points turns red, and their heart icon is only half filled

Reminders


Any time a reminder occures they pop up at the bo
ttom of the window. They remind you to make saving throws for ongoing damage or that acreature takes damage at the start of their turn. They also notify you when a creature dies and when a creature becomes bloodied

Second Wind


To heal a character is the same as causing damage.
  • click on hit points
  • select your target
  • click on second wind
  • if you leave the field empty the program does its own calculations
  • however most people heal more, so make sure you put that in there.
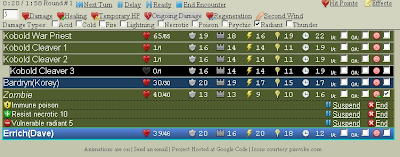
When a player is under the effects of a second wind it will show


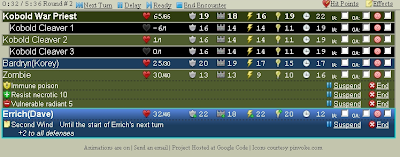
Here we can see dave has +2 to all defenses

Effects


If a spell or power is going to add a effect to a player or creature follow the similar steps as before, remember with any good program things should be similar
  • Select your target
  • click on Effects
  • Give an effect for your name and add notes if need be
  • Use the drop downs to select the proper duration
  • add any modifiers to any defenses
  • Click on apply effect


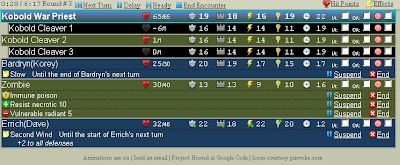
Now we can see korey is slowed until the end of his next turn; you can have multiple effects on creatures


Here we see korey has ongoing 5 necrotic, and just took his secondwind

Ending the Encounter
When your done at the top you can see how long everything took, how many rounds, and you can click on end encounter


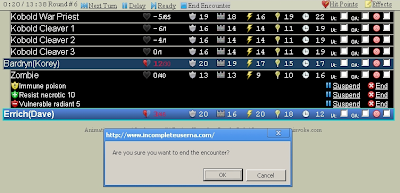
When you do the program will double check before proceeding back to the main screen Now you can see how to use the tracker at its basics, if you play around with the manage groups button you can create a list of monsters for all the nights encounters and your off.

Well i hope everyone likes this guide, and enjoys the program. I had nothing to do with making it but it deserved some notice.

If you run a blog please link back to this so more people know, If your on twitter please tweet this articlethats it for me for today, until next time keep your dice on the table.

Tuesday, May 5, 2009

Crafts: Tile Mat


This weeks late entry is about create a surface area for you tiles. I myself love the tile sets WotC puts out, our group rather enjoys them and we chip in on each set at least once.

Since 4e, we have continued to try and find a way to properly setup the encounters so were not bumping the tiles around, and as a DM i was looking for a way where i can build my encounters in advance and then go with the flow on game night.

This project has had many version, and this final version is the one that works.

What you'll need
  • Tiles
  • Sticky Tack
  • Grip, no Slip shelve mats
  • Large strong cardboard at least 30"x30"
  • Hot Glue Gun

Roll out the mat on the cardboard, using the hot glue gun, glue the mat to the cardboard around the outside. Make sure you put your glue down in a zig zag pattern coming back on yourself, and only do a small length at a time.

Each time you press down, pat the mat quickly with your hand. Be careful the glue has not hardened yet, in fact this will hurt as glue particles ill pull up from the cardboard, through the mat and stick on your hand.

Why would you want to do this? well this will force the glue up through the mat and creates a better hold.

When your done, you have one encounter mat all setup. I have two because at most our group has gone through 2 encounters a night, that's all i need.

Now you take the silly putty and make small gob that you stick to the corners of the underside of the tile you want.


Then place it down on the mat and push it down with some force

Continue doing this until your encounter is finished. This creates a bond strong enough that you can tuck this away behind furniture all week and it will stay put. And with a flick of the wrist you can pull the tile off, reuse the sticky tack and nothing is damaged.

Wednesday, April 29, 2009

Dungeon Master Tips: Organizing your Adventure

This week i am going to discuss how you can organize your adventure. All adventures in my opinion require a bit of planing. For every hour you intend to play an adventure you should spend the same amount of time planing.

I personally break up all of my adventures into 8 encounters, i mix and match the kind of encounters i want to do but for me a single adventure takes players from one level to another in 8 encounters. At our speed that's 4 weeks of game play.

Tools

There are various tools at your disposal but for me my main ones are the Dungeon Master Guide , MS Word, MS Viso, DDI Compendium, and DDI encounter builder.

MS Visio

The key to a good adventure is not wanting to railroad your players. So i create a start of my adventure, and a end, where i want my players to end up. I'll add a few boxes to the Viso showing possible pieces of information they can find. As i figure out the general storyline i then plot everything out into the Viso. the key is to make it fit on one page

Don't have MS Visio? Try LucidChart

Dungeon Master Guide

Great for references, nuff said.

MS Word

I build my encounters in MS, The first page contains the adventure name and details, the second page is blank. The third and fourth page is a the basic story line and my RP notes, while the 5th page contains the Visio drawing from earlier.

Now i break up the encounters so that the basic encounter information is on the left hand side, and the map (which honestly I've taken from dragon and customized for my own needs) on the right hand side. The next few pages contains monsters information taken from the DDI Compendium so i have everything i need in one place.

I repeat the encounters in the exact same method adding blank pages where i need to.

Don't have MS Word, try OpenOffice

DDI Encounter Builder & DDI Compendium

The DDI Compendium has two tasks for me, one is finding monsters and creatures that fit my story, level, and encounter so nothing seems out of place. The second is to copy & past into word so i have all my information during game play. I recommend for monster pages to be two columns, and formatting the text a bit. i can fit large monsters in 1 full column, and usually two minions per column.

The encounter build i use after i have a list of creatures in mind, and just use it to figure out what creatures are going to be in each encounter.

Don't have a DDI Account, try Monster Lister & Encounter Planner

Binding

Once i have everything checked over and it looks the way i want it to look, i save it off as a PDF (plenty of PDF printers out there) and upload it to staples. I will get it printed on both sides in black & white (so when your doing your map use circles with letters in them to identify monsters (A)). And i pick a cheap binding. the hole process costs me around $4.50 for a 30 page document.

Additions

Another great addition to add after the fact is the 'PrintableDM' sheets i mentioned before hand, I'll send them to staples at the same time for printing and usually get 8 done at a time. if your lucky they will accidentally bend the corners on them and you don't have to pay. good thing i was folding them in half anyway :)

So there you have it, you spent 8 hours designing your adventure, and saving all the information and you have a nice hard copy to show for it. Some of you are thinking, 8 hours that's a full days work for me. Well sometimes being a DM is, but when you have everything organized and know where your game is going, you can spend a hour a night on it after the kids have gone to bed. Before you know it your two adventures ahead of the game

That's all for this week's DM's tips, remember its us vs. them!

Monday, April 27, 2009

Crafts: Walls

So this week i am going to show you how to build basic walls. These walls are great when you need to show that there is something physically in the way, and can also be used as bushes.

Here is what where going to need to get started

Sharpie, Hot-glue gun, scissors, cardboard, tiles, cleaning scrub pads (pack of 12 for 1$)

Now first we are going to make a 4 square long walls, i make all my wall height 1.5 squares, because it gets the idea across and makes it pretty universal.


as you can see here, i traced a 2 square by 4 square area on the scrub pad, using the tile as a guide line. To ensure that i have the area i need i am going to make sure is 3 squares by 4 squares


Now we cut out what we don't need


We can save the excess (make 1 square bushes by rolling them up)
but our next step is to fold it in half, and have some guide lines.


you don't need to draw these lines in, they are just here to show

now that this is folded, we simply place hot glue along the lines one at a time, holding it closed and waiting a minute after each line to dry before proceeding to the next


make sure you add pressure to each glue so that the piece feels like one

Now while the entire piece is drying lets make the base, using the tile set and the cardboard, trace out a 2 square by 4 square area (if you have 1x4 blocks use them instead) and cut out that pathway


now place a bead of glue along the base of the wall, the base is the end that was folded onto itself. and place the wall in the center of the base you just cut out


and let it dry.

There you have it, a simple wall, you can sit back and make a bunch of these easy in an hour if you break everything down in steps.

Blog Archive